Minecraft-SSHD

![]()
Have you ever wished you could remotely access your server's admin console without having to setup a complex remote access system? Now you can with Minecraft-SSHD!
Minecraft-SSHD securely exposes your Minecraft admin console and the server filesystem using the SSH protocol - the same protocol that serves as the secure foundation for nearly all remote server administration.
- Compatible with all ssh clients, regardless of operating system.
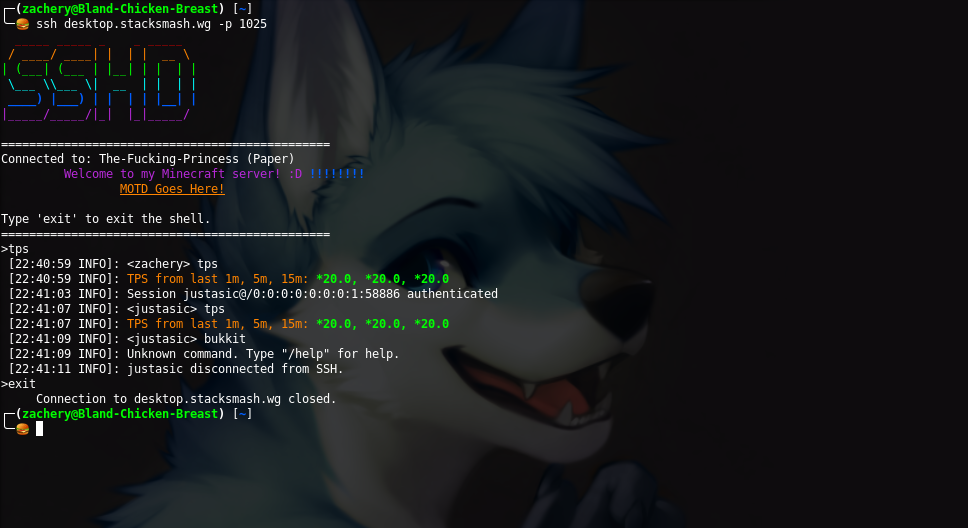
- Remotely view your server log in real-time.
- Remotely issue commands from the server console, just as if you were on the server itself.
- Supports multiple concurrent remote connections.
- Strong identity support using public key authentication.
- Audit history who is running commands in the console
- Run Spigot without using screen or tmux (by adding
-noconsole) - Remotely script your server by issuing one-off console commands with ssh.
Why should I use Minecraft-SSHD?
- You are in a shared hosting environment that only gives you access to the - log files.
- You want to share access to your server console, but don't want to give anybody access to the machine its running on.
- You always wanted to use RCON, but want to see the server log as well.
- You are tired of running your server in a GNU screen or tmux session.
- You just want to access your server console using SSH.
Note: By default, only public key authentication is enabled. This is the most secure authentication mode! Setting a username and password will make your server less secure.
Screenshots

Setting Up Public Key Authentication
Setting up public key authentication with SSH requires first generating a public and private key pair and then installing just the public key on your Spigot server. This plugin supports all modern SSH key algoritms as OpenSSH. You can paste as many public keys from the methods below into each user's authorization file if they have multiple private keys. You can read this guide from ssh.com if you want a better explanation on different key files.
Generating New Keys
On Windows
- Ensure Putty is installed and open up
puttygen(you can search for it in start search). - Click
Generateand follow the directions. - When it finishes, set your key comment (if you like) and copy the text from the big
Public key for pasting into OpenSSH authorized_keys file - Create a new file inside of the
plugins/SSHD/authorized_usersfolder and name the file just the username (example:justasic, there should NOT be a file extension or authentication does not work). - Paste the key you copied from step 3 into the file you just created.
- SSH into the server and see if your key works
On Linux/OS X
- Open a terminal and run
ssh-keygenthen follow the prompts. - Copy the contents of your
id_<algorithm>.pubfile (example: if your key was generated with rsa, it will be namedid_rsa.pub). This file is usually located in/home/YOURUSERNAME/.ssh/ - Paste the contents of the .pub file into a new file inside the
plugins/SSHD/authorized_usersfolder and name the file just the username that the user will use to login with (example:justasic, there should NOT be a file extension or authentication does not work).
Using existing keys
On Windows
- Ensure Putty is installed and open up
puttygen(you can search for it in start search). - Click
Conversionsthen clickImport Keyand select your .ppk file. - Copy the text from the big
Public key for pasting into OpenSSH authorized_keys file - Create a new file inside of the
plugins/SSHD/authorized_usersfolder and name the file just the username (example:justasic, there should NOT be a file extension or authentication does not work). - Paste the key you copied from step 3 into the file you just created.
- SSH into the server and see if your key works
On Linux/OS X
- Copy the contents of your
id_<algorithm>.pubfile (example: if your key was generated with rsa, it will be namedid_rsa.pub). This file is usually located in/home/YOURUSERNAME/.ssh/ - Paste the contents of the .pub file into a new file inside the
plugins/SSHD/authorized_usersfolder and name the file just the username that the user will use to login with (example:justasic, there should NOT be a file extension or authentication does not work).
Plugin Usage
Commands
/mkpasswd <hash|help> <password>
mkpasswd supports the following hash algorithms:
- bcrypt - Using the OpenBSD-style Blowfish password hash
- sha256 - Using a basic salted sha256 hash
- pbkdf2 - Using the PBKDF2 password hash
- PLAIN - Using plain text passwords (very insecure)
Permissions
sshd.mkpasswd - Checks if the in-game user has access to run the mkpasswd command.
Minecraft-SSHD uses cryptographic certificates or a secure username and password to verify remote access.